Note: When working with your own colors, play with the Blend mode and/or Opacity at your own discretion Color used
Preparation Double clic on the preset "@qua_21.f1s" and it will be imported automatically
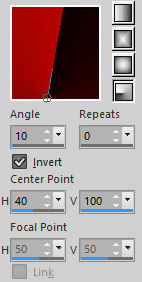
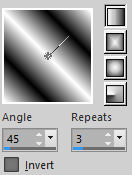
1. Materials palette: Set the Foreground color on #b40501 and the Background color on #0d0100. 2. Open "selections_alpha_karyanne". 3. Window/Duplicate (SHIFT+D) and close the original. 4. Work in the copy. 5. Rename this layer "Raster 1". 6. Set the foreground to gradient style radial:
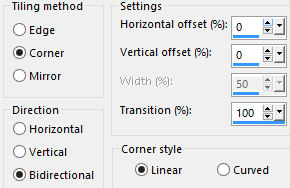
7. Flood fill the layer with the foreground gradient. 8. Layers/Duplicate. 9. Image/Mirror/Mirror Horizontal. 10. Set the blend mode of this layer to overlay. 11. Layers/Merge/Merge down. 12. Effects/Image effects/Seamless Tiling:
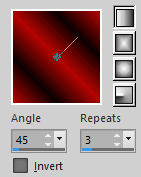
13. Set the foreground to new gradient style linear:
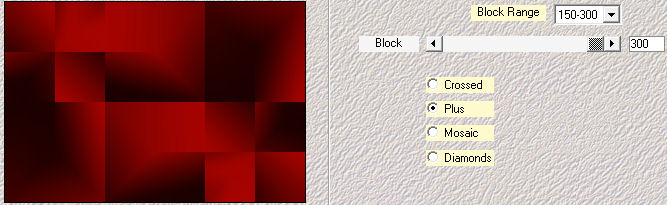
14. Layers/New raster layer. 15. Flood fill the layer with the foreground gradient. 16. Adjust/Blur/Gaussian Blur: radius 35. 17. Effects/Plugins/Mehdi/Sorting Tiles:
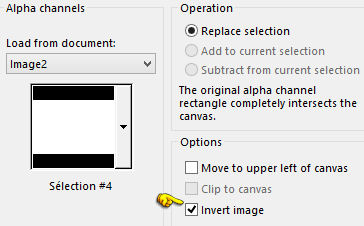
18. Image/Resize to 80% (all layers not checked). 19. Layers/New raster layer. 20. Selections/Load/Load selection from Alpha Channel and choose "Selection #4":
21. Selections/Invert. 22. Flood fill the selection with the color #ffffff. 23. Selections/Select none. 24. Selections/Modify/Contract: 2 px. 25. Hit the Delete Key of your keyboard. 26. Selections/Select none. 27. Layers/Duplicate. 28. Activate the Raster 3. 29. Effects/Plugins/Unlimited 2/Toadies/What Are You: 5 / 5. 30. Activate the Raster 2. 31. Effects/Plugins/AP [Lines]/Lines-Satin with default settings:
32. Set the blend mode of this layer to luminance. 33. Activate the top layer (Copy of Raster 3). 34. Layers/New raster layer. 35. Activate the selection tool and choose the custom selection:
36. Flood fill the selection with the color #ffffff. 37. Selections/Modify/Contract: 2 px. 38. Hit the Delete Key of your keyboard. 39. Set the Opacity of the Flood fill toll to 50.
40. Flood fill the selection with the color #ffffff. 41. Selections/Select none. 42. Layers/Duplicate. 43. Image/Mirror/Mirror Horizontal. 44. Layers/Merge/Merge down. 45. Set the opacity of this layer to 50. 46. Layers/Duplicate. 47. Effects/Image effects/Seamless Tiling: settings in memory. 48. Set the opacity of this layer to 100. 49. Layers/New raster layer. 50. Selections/Load/Load selection from Alpha Channel and choose "Selection #4":
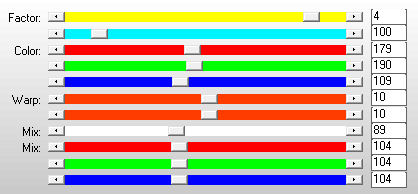
51. Selections/Invert. 52. Set the Opacity of the Flood fill toll to 100. Flood fill the selection with the color #ffffff. 53. Selections/Modify/Contract: 5 px. 54. Hit the Delete Key of your keyboard. 55. Selections/Select none. 56. Effects/Plugins/Flaming Pear/Flexify 2:
57. Select the center of the figure with the magic wand tool (tolerance 0 - feather 0 - mode Add (shift))
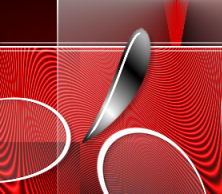
58. Set the Opacity of the Flood fill toll to 20. Flood fill the selections with the color #ffffff. 59. You should have this:
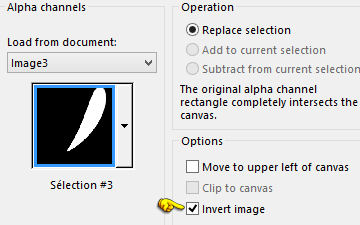
60. Selections/Select none. 61. Effects/Image Effects/Offset: horiz. -120 / vert. 35 / custom and transparent. 62. Layers/Duplicate. 63. Image/Mirror/Mirror Horizontal. 64. Image/Mirror/Mirror Vertical. 65. Effects/Image Effects/Offset: horiz. -300 / vert. 35 / custom and transparent. 66. Layers/Merge/Merge down. 67. Effects/3D Effects/Drop Shadow: 4 / 4 / 25 / 5 / #000000. 68. Layers/New raster layer. 69. Selections/Load/Load selection from Alpha Channel and choose "Selection #3":
70. Selections/Invert. 71. With the foreground color #ffffff and background color #0d0100 set the new gradient Style linear:
72. Set the Opacity of the Flood fill toll to 100. Flood fill the selection with the foreground gradient. Effects/Plugins/Alien Skin Eye Candy 5 Impact/Glass: from the User Settings choose the preset "@qua_21". 73. Selections/Select none. 74. Effects/3D Effects/Drop Shadow: settings in memory. 75. Place between the fleurs like this:
76. Open the tube of woman "TubeNaraPamplona 1511". Edit/Copy and paste as new layer. 77. Image/Resize to 70% (all layers not checked). 78. Place to right as final work. 79. Effects/3D Effects/Drop Shadow: 10 / 10 / 45 / 25 / #000000. 80. Image/Add borders symmetric of 2 px color #ffffff. 81. Image/Add borders symmetric of 35 px background color #0d0100. 82. Select the border dark with the magic wand tool. 83. Set the foreground to new gradient style linear (foreground color #b40501):
Flood fill the selection with the foreground gradient. 84. Selections/Invert. 85. Effects/3D Effects/Drop Shadow: settings in memory. 86. Selections/Select none. 87. Image/Add borders symmetric of 2 px color #ffffff. 88. Layers/New Raster Layer. 89. Add your signature. 90. Layers/Merge/Merge all (Flatten). 91. Image/Resize to 950 px of width. Save as jpeg file. My version with the tube of Celeste
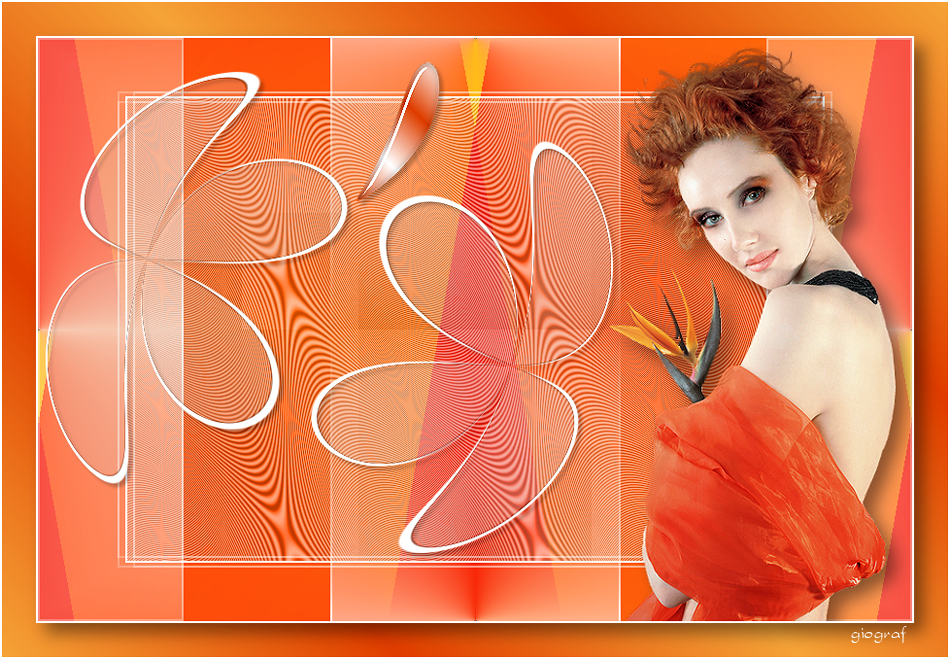
Your beautiful versions - Thanks My tester Giograf - I version
My tester Giograf II version
Kata
Tutorial translated by Byllina the 11 october 2015 |