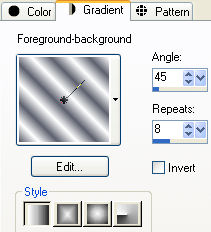
Preparation Open the masks "LF-Mask-163" and "LF-Mask-165" on psp and minimize to icon Place the selection "VSP Quand vient l'hiver3" in the Selections folder Double click on the Eye Candy preset "Shadow_Quand_vient_hiver VSP1" and "Shadow_Quand_vient_hiver VSP2" and they will be imported automatically Materials palette: Foreground color dark on #5c606d and the Background color light on #ffffff Set the foreground to style linear:
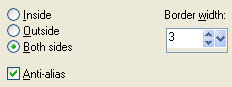
1. Open "Alpha_Quand_vient_hiver VSP". Flood fill the layer with the gradient. 2. Adjust/Blur/Gaussian Blur: radius 50. 3. Layers/New Raster Layer. Flood fill the selection with the background color. Layers/New mask layer/From image and choose "LF-Mask-165": marquer source luminance and Invert mask data. Layers/Merge/Merge group. Cange the opacity of this Layer to 45. 4. Layers/New Raster Layer. Flood fill the selection with the background color. Layers/New mask layer/From image and choose "LF-Mask-163": marquer source luminance and Invert mask data. Layers/Merge/Merge group. Effects/3D Effects/Drop Shadow: 2 / 2 / 50 / 2 / #000000. Layers/Merge/Merge visible. 5. Layers/New Raster Layer. Selections/Load/Load selection from Alpha Channel and choose "Selection #1". Flood fill the selection with the background color. Open the misted of landscape "9584751a". Edit/Copy and paste into selection. Selections/Modify/Select Selection Borders:
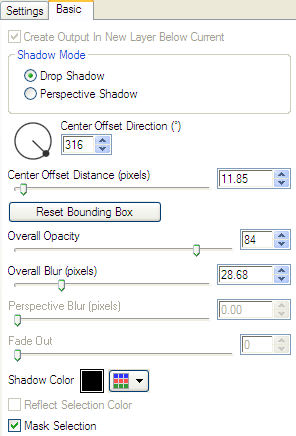
Layers/New Raster Layer. Flood fill the selection with the foreground gradient. Adjust/Add Noise: uniform / monochrome / Noise 79. Selections/Select none. Effects/3D Effects/Drop Shadow: settings in memory. Layers/Merge/Merge down. Effects/Plugins/Alien Skin Eye Candy 5 Impact/Perspective Shadow: in the User Settings choose "Shadow_Quand_vient_hiver VSP1". If you have the problems with this preset put these settings:
6. Activate the layer Merged. Selections/Load/Load selection from Alpha Channel and choose "Selection #2". Effetcs/Plugins/VM Natural/Sparkle:
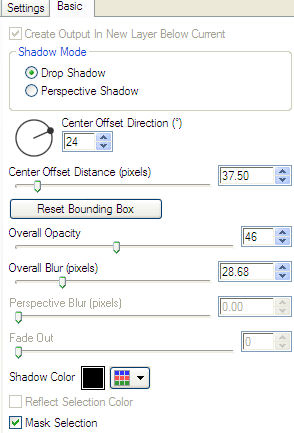
Selections/Select none. Layers/Merge/Merge visible. 7. Open the tube "sapin". Edit/Copy and paste as new layer. Image/Resize to 80% (all layers not checked). Effects/Image Effects/Offset: horiz. -263 / vert. 19 / custom and transparent. Effects/Plugins/Alien Skin Eye Candy 5 Impact/Perspective Shadow: in the User Settings choose "Shadow_Quand_vient_hiver VSP2". If you have the problems with this preset put these settings:
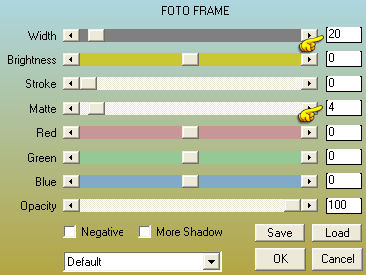
8. Open the tube "deco 1". Edit/Copy and paste as new layer. Place in the bottom left corner. Effects/3D Effects/Drop Shadow: 2 / 2 / 30 / 4 / #000000. 9. Open the tube "JB_cutencuddly_penguins". Edit/Copy and paste as new layer. Image/Resize to 50% (all layers not checked). Adjust/Sharpness/Sharpen. Effects/Image Effects/Offset: horiz. -55 / vert. -241 / custom and transparent. Effects/3D Effects/Drop Shadow: 0 / 10/ 50 / 20 / #000000. 10. Open the tube "tubtatie_d7182u9". Edit/Copy and paste as new layer. Image/Resize to 60% (all layers not checked). Adjust/Sharpness/Sharpen. Effects/Image Effects/Offset: horiz. 269 / vert. -36 / custom and transparent. Effects/Plugins/Alien Skin Eye Candy 5 Impact/Perspective Shadow: settings in memory. 11. Open the tube "deco 2". Edit/Copy and paste as new layer. Image/Resize to 60% (all layers not checked) twice. Adjust/Sharpness/Sharpen. Effects/3D Effects/Drop Shadow: settings in memory. Effects/Image Effects/Offset: horiz. 352 / vert. 254 / custom and transparent. 12. Open the tube "243883deco3". Edit/Copy and paste as new layer. Image/Resize to 60% (all layers not checked). Place at the top left. Layers/Merge/Merge all (Flatten). Open the tube "titre VSP". Edit/Copy and paste as new layer. Place as the final work. 13. Selections/Select all. Image/Add borders symmetric of 5 px foreground color. Selections/Invert. Flood fill the selection with the foreground gradient. Adjust/Add Noise: uniform / monochrome / Noise 79. 14. Selections/Select all. Image/Add borders symmetric of 50 px foreground color. Selections/Invert. Flood fill the selection with the foreground gradient. Effects/Plugins/AAA Frames/FotoFrame:
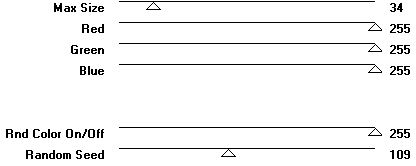
Selections/Invert. Effects/3D Effects/Drop Shadow: 0 / 0 / 80 / 50 / #000000. 15. Selections/Select all. Image/Add borders symmetric of 5 px foreground color. Selections/Invert. Flood fill the selection with the foreground gradient. Adjust/Add Noise: uniform / monochrome / Noise 79. Selections/Select none. 16. Add your signature. Layers/Merge/Merge all (Flatten). If you don't want the animation you can save your work as jpeg file. Animation 17. Layers/Duplicate three times. On the top layer: Selections/Load selection from disk and choose "VSP Quand vient l'hiver3". Effects/Plugins/VanDerLee/Snowflakes:
Close the visibility of this layer. Place on the layer below. Effects/Plugins/VanDerLee/Snowflakes: Random Seed 800. Close the visibility of this layer. Place on the layer below. Effects/Plugins/VanDerLee/Snowflakes: Random Seed 1500. Close the visibility of this layer. Place on the layer below. Effects/Plugins/VanDerLee/Snowflakes: Random Seed 2000. Selections/Select none. Open the visibility of all layers. Image/Resize to 950 px (all layers checked). 18. Edit/Copy the background layer. Open the Animation Shop. Edit/Paste as a new animation. You back on psp. Edit/Copy the layer. On the Animation Shop: Edit/Paste after the current frame. You back on psp. Edit/Copy the layer. On the Animation Shop: Edit/Paste after the current frame. You back on psp. Edit/Copy the layer. On the Animation Shop: Edit/Paste after the current frame. On the Animation Shop: Edit/Select all. Animation/Frame Properties: set to 20. Save as gif file. La splendida versione della mia tester Giograf - Grazie
Grazie per le vostre bellissime versioni Annelie
Tutorial translated by Byllina the 2 december 2014 |